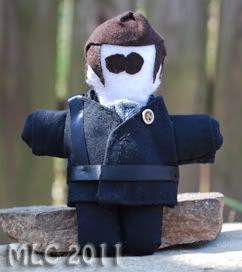
How to Make a Miniature Plush Doll
By MLC 2011
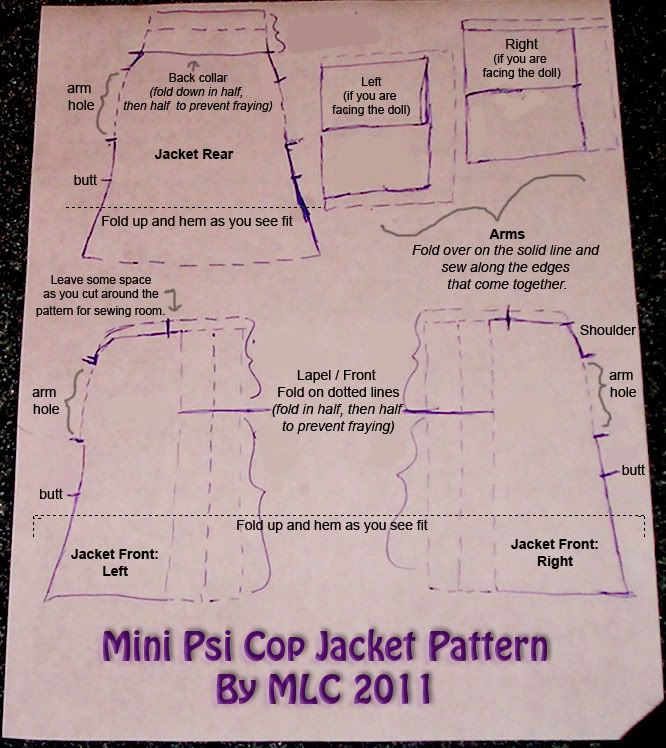
| Doll Pattern | Optional Coat Pattern |
If you decide to use and post the pattern, please credit me, thank you!
Using the Pattern
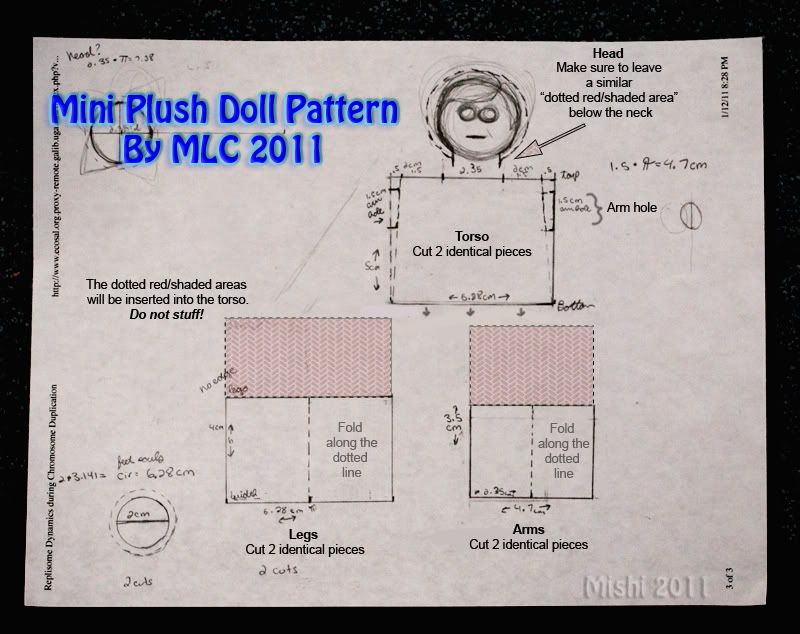
***The pattern is marked with measurements to make it scalable***
- Print the pattern
- Click the link, “Doll Pattern”
- Right click, “save as” and follow the prompts
- Print from a photograph/picture program
- Cut the pieces out
- Pin them to fabric (for the ones that need 2 pieces, fold the fabric over before pinning it in place)
- Leave ½ cm of fabric around the pattern edges (or more depending on how thick you want the limbs and torso)
Limbs
- Leave a lot of space at the top of the pattern (as shown) when you make the initial cuts
- Fold in half (over the dotted lines in the patterns)
- Sew along the bottom and edge, leaving the top open
- *optional* you may cut it so that the bottoms are rounded
- The limbs should look like small tubes: stuff them with stuffing of your choice
- Leave some of the space at the top free because you will be inserting that part into the torso (so that the limbs can be sewn into it)
- Sew a straight line to close the stuffing off (make sure the seem is closer to the stuffing than it is to the end of the limb)
Optional (feet)
- Use the circular patterns and follow the steps for “Using the Pattern”
- Sew into the soles of the feet instead of sewing the bottom of the legs shut
Head
*** You may have to cut the head a bit larger than shown in the pattern (depending on personal preference and hair style) ***
- Follow the instructions for “Using the Pattern”
- Make sure you make the neck extra long, as this will be used to connect it to the body
- Hair and eyes can be pinned to the outer sides at this stage
- Sew the seams shut, but make sure you leave the neck open enough so that you can stuff it
- Stuff it, leaving enough loose space in the neck to allow you to insert it into the body
- Insert it into the completed Torso and follow the steps for “Finish the Doll”
Torso
Arms/sides
- Start with one side
- Pin the two pieces together. As you do this, pin one of the arms between them in its respective slot
- Make sure the stuffed arm is inside the torso and not hanging out of the future seam (only the long/loose end should be hanging out)
- Sew the pieces together
- Using the other side of the torso, open it to make sure the arm is attached to the seam you just finished
- Fold the side back so that it’s “inside out” (the stuffed arm should be inside the torso)
- If the other arm fits inside of the torso, allowing you to pin everything in place, repeat steps 1 – 6 and skip to step 15. If not, go to step 8.
- Fold one of the ends to the other side over as though you are hemming a garment
- Pin the other arm to that end only (stuffed end should be pointing away from the hemmed side)
- Make sure the torso is “inside out”
- Start from the bottom of the other side and sew the seam shut until you reach the arm
- Flip the torso so that its not “inside out” anymore
- The second side (the open arm slot) should naturally fold over now that you’ve started sewing the seam (if not, make sure it is folded like a hem)
- Sew along the nice, folded edges you made to secure the arm in place
Legs/bottom
- Fold one of the bottom sides up (make sure the torso not inside out), into the body as though you are about to hem a garment
- Pin both legs along that side with the loose ends up, inside of the torso (stuffed ends should be hanging free)
- Fold the other bottom edge of the torso up as you did in step 15
- Sew along that outer edge, securing the legs in place
Finish the Doll
- Fold the top ends over as though you are about to hem a garment
- Insert the completed head and hold it against the back end (you can pin it in place if you want)
- Stuff the torso
- Sew the folded ends shut, securing the stuffing and head in place
Comments
Post a Comment